Mosquitto MQTT Install and Run part 1
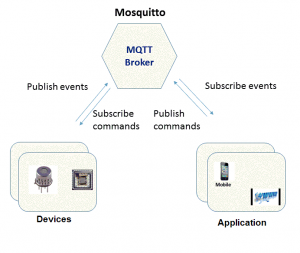
MQTT (Message Queue Telemetry Transport) is a publish subscribe messaging protocol for use on top of the TCP/IP protocol. It is designed for connections with remote locations where a small code footprint is required or the network bandwidth is limited.
Mosquitto is an open-source message broker service that uses the MQTT protocol to send and receive messages, typically with IOT (Internet of Things) devices.

Components
MQTT has following components
- Broker is responsible for coordinating the communication between publishers and subscribers. It can also store messages while subscribers are offline
- The Publisher sends a message to the network.
- The Subscriber listens for messages with a particular topic.
- A message has a topic and a payload, like the subject and the content of an e-mail
Installation
In order to run complete system, Mosquitto Broker service is required to run on a machine which is always ON. Client binaries needs to be installed on Subscriber device and Publisher Device.
Broker
There is a free Mosquitto Broker available at Eclipse IoT but if you want to install it in your own device/server then follow below steps.
Mosquitto Broker can be installed on any device. Here I’ll show you how to install it on a Debian based system.
sudo apt-get install mosquitto
This installs and also starts the mosquitto daemon. You can check if it is working by issuing following command.
service mosquitto status
If you prefer more secured environment then follow below steps to configure Broker.
Add user
sudo mosquitto_passwd -c /etc/mosquitto/pwfile
you will be prompted to enter a password.
Edit Mosquitto config file
sudo nano /etc/mosquitto/mosquitto.conf
Paste In below lines
pid_file /var/run/mosquitto.pid
persistence true
persistence_location /var/lib/mosquitto/
log_dest file /var/log/mosquitto/mosquitto.log
include_dir /etc/mosquitto/conf.d
listener 8883 0.0.0.0
persistence_file mosquitto.db
log_dest syslog
log_dest stdout
log_dest topic
log_type error
log_type warning
log_type notice
log_type information
connection_messages true
log_timestamp true
allow_anonymous false
password_file /etc/mosquitto/pwfile
Run
sudo /sbin/ldconfig
Modify upstart file to autorun from new configuration.
sudo nano /etc/init/mosquitto.conf
Modify as per below commands
description "Mosquitto MQTT broker"
start on net-device-up
respawn
exec /usr/sbin/mosquitto -c /etc/mosquitto/mosquitto.conf
Start/Restart service
service mosquitto start
Mosquitto Clients
In order to test your Mosquitto Environment, you need mosquitto client. Follow below steps to test Subscribe and Publish mechanism.
Install Client
Issue below commands on console to install mosquitto clients
sudo apt-get install mosquitto-clients
Subscribe test
Issue below command to subscribe to broker service
mosquitto_sub -h <ip_broker> -p 8883 -v -t 'topic/test' -u <user_id> -P <password>
Publish test
Open another SSH window and type in below command to publish a test message
mosquitto_pub -h <ip_broker> -p 8883 -t 'topic/test' -u <user_id> -P <password> -m "Hello World"
If everything goes fine then you can see “Hello World” message on Subscriber window
In Part 2, I’ll show you how to write Subscribe client in Python and Publish client in PHP to control a device from Web / Mobile.
Great post. You can do the same using docker containers, just with lesser hassle
Thanks.
Quality posts is the secret to interest the users to go to see the site, that's what this web page is providing
Great post. May anyone post a link for part 2 ? Thanks in advance.
Great post. But may anyone give me a link for part 2 ? Thanks in advance.